Flutter, developed by Google, is an open-source user interface (UI) software development kit (SDK) that in no time, gained so much popularity and love. It is one of the top choices for cross-platform app development and benefits developers and businesses. However, how much ever efficient the toolkit is, developers need to still implement some best practices to optimize results. Thus, in this blog, we discuss Flutter’s best practices for maximum gains.
11 Best Practices of Flutter
With each passing year, new innovations with traditional as well as emerging technologies are helping many industries to revolutionize. However, with technological advancements, software development is becoming more complex and nuanced.
To keep up with the maturing technology, it becomes important to implement the best practices while programming for lucrative results.
While Flutter is one of the most used frameworks for the development of cross-platform apps, it has some best practices that developers should adhere to. These best practices ensure that the Flutter app built is cost-effective and high-performing.
Here are some of the best practices in Flutter for developers to take notes:
1. Use state management
The first and foremost point included in the flutter best practices is proper state management. Before jumping into the ‘how’ of it, let’s understand the ‘what’ and ‘why’ of it.
State in Flutter refers to any data required to rebuild the app’s UI at any moment in time and that can change during the lifetime of a widget. Whenever there are changes in this data, it will trigger a redraw of the UI.
For example, when a user likes a post in a social media app made using Flutter, the developer is required to update the UI to reflect the change in the number of likes. This manual update of the UI to reflect these changes to the underlying data could gradually become time-consuming, messy, error-prone, and unsustainable as the app complexity grows.
Another example could be a shopping app made using Flutter. The app allows the user to filter products based on price, category, and availability. Each filter that is applied, leads to a change in the list of products displayed on the screen. Without proper state management, however, the app’s performance would have suffered, resulting in a poor UX.
Thus, proper state management in Flutter facilitates efficient handling of user interface updates in response to user interactions to management of data fetched from APIs. It maintains, updates, and synchronizes the data that the Flutter app relies on to function correctly.
However, any kind of state management is not set by Flutter as its core feature. As a result, developers often end up with a complex combination of parameters. These parameters pass or store all data in permanent memory for status control. This is the sole reason why app scalability as well as maintainability should be kept in mind while choosing a state management solution.
Further, although states could be managed through stateful widgets, these widgets could not be scaled across various screens. To overcome this, state management is leveraged to centrally store data and alter the connected dependencies whenever needed in real-time. This gives users the freedom to choose their preferred handling states.
Thus, these state management solutions should be chosen considering the app’s complexity. Some widely used options are Provider, BLoC, GetIt, Riverpod, GetX, and MobX.
Moreover, developers should avoid using setState excessively and instead make use of state management to efficiently handle state changes. Lastly, businesses and developers should keep the UI of the app as simple and stateless as possible.
Must Read: Cost to Build a Flutter App
2. Use null safety
The next best practice in Flutter is implementing null safety.
If any API response shows a null value, there are chances of an app crash. This means whenever an app makes an attempt to access a null object reference, it more often than not, leads to app crashes.
This usually happens when a variable is not initialized or lack of proper passing of an object reference between classes or methods. As a result, Flutter 2.0 introduced null safety. It helps to avoid this error by ensuring that variables are always initialized before they are used.
However, one can catch Flutter app crashes due to null exceptions using static analysis. Tools such as `dart analyze`, which is a built-in static analysis tool in the Dart SDK, could be leveraged for the same.
To implement null safety, always go for ?? (if null) and ?. (null aware) operators and not null checks in conditional expressions.
//Do

v = a ?? b;

//Do not

v = a == null ? b : a;


//Do

v = a?.b;

//Do not

v = a == null ? null : a.b;
3. Use const keyword
The const keyword in Flutter acts as an indicator to tell the compiler about the variable that will remain same or never change in the lifetime of this code. Const could be used for compile time constants, such as numbers, strings or doubles.
The importance of const keywords is greater if one has classes and their constructors. Flutter has widgets and each widget used is called a class. Further, it is useful when the object infuses Flutter what must be done when it bumps into a constant constructor, that cannot be changed. What is a constructor though? A constructor that divides all its final fields is called a constant constructor and is frequently denoted with a const in front of the constructor.
With a const constructor for widgets, the workload on garbage collectors lessens. This might seem like a small addition initially. However, it adds up and as the app matures, or in the case of a view that gets rebuilt often, the use of a const constructor makes a huge difference.
Additionally, these declarations are more hot-reload friendly. Another thing that must be kept in mind is to ignore the irrelevant const keyword.
Therefore, minimize widget rebuilds by using ‘const’ constructors for stateless widgets.
Take an example of the following code:
const Container(

  width: 100,

  child: const Text('Hello India')

);
In the above example, there is no need for const for the Text widget since it is already applied to the parent widget.
Furthermore, Dart offers the following Linter rules for const:
prefer_const_constructors

prefer_const_declarations

prefer_const_literals_to_create_immutables

Unnecessary_const
The use of const keywork is hence important and is thus a Flutter best practice.
4. Widget optimization
Widget optimization point is another one of the Flutter best practices. It includes:
Split Your Code into Small Widgets
Splitting your code into small widgets simply means breaking the big screen into smaller, digestible pieces. In simpler terms, it means breaking your UI into smaller widgets for clarity and unambiguity.
Use Common Widgets
This means creating reusable widgets to maintain a DRY (Don’t Repeat Yourself) codebase. These widgets are kept the same throughout the app, just a few visual details are modified as and when required.
Trending Now: Advantages of Flutter for App Development
5. Choose Widgets over method
One of Flutter’s best practices, choosing widgets over methods simply means structuring the Flutter code to enhance code readability, reusability, and maintainability. Refactoring the code into widgets ensures the avoidance of unnecessary builds. Changes in the widgets alone can trigger rebuilding. Additionally, through this methodology, a developer will be able to take advantage of every widget class optimization offered by Flutter.
This best practice in Flutter encourages developers to use widgets to build the UI components of their apps over the build method when defining UI elements. Therefore, instead of writing all the UI code directly in the build method of the app’s stateful or stateless widget, it’s better and hence, recommended to create separate widget classes for multiple UI components. This enhances app performance, among other things.
For example,
// Using Widgets

class MyWidget extends StatelessWidget {

  @override

  Widget build(BuildContext context) {

    return Container(

      child: Column(

        children: [

          Text('Hello, World!'),

          RaisedButton(

            onPressed: () {

              // Button action

            },

            child: Text('Click Me'),

          ),

        ],

      ),

    );

  }

}
6. Prevention of Memory leaks
The next best practice in Flutter is to restrict the use of streams and disposing objects no longer in use to avoid memory leaks.
Memory leaks are a common issue in app development and usage journeys. To avoid that, developers can do the following things:
Very Minimal use of Streams
Streams should be used very responsibly in Flutter as with poor implementation, their usage can lead to greater memory and CPU usage. Additionally, if one forgets to close the streams, there will be significant memory leaks. The confidential data circles and remains in the app until one kills it, which raises data security issues.
Furthermore, using Stream only for one event could lead to negative outcomes. In such cases, make use of Future instead of Stream. The latter should only be used in case of asynchronous events handling.
In the above cases, you can instead use something that consumes less memory like ChangeNotifier to build reactive UI. Bloc library could be leveraged for more advanced functionalities. This library focuses on using the resources more efficiently and provides an easier interface to develop reactive UIs.
Clearance of streams when they are no longer in use happens in an effective manner. However, if one just removes the variable, it is not enough. It could be still running in the background.
Now, in this case, one needs to call Sink.close() to stop the associated StreamController. This ensures that resources can eventually be freed by the GC.
To initiate that, one must use StatefulWidget.dispose of method:
abstract class MyBloc {

  Sink foo;

  Sink bar;

}


class MyWiget extends StatefulWidget {

  @override

  _MyWigetState createState() => _MyWigetState();

}


class _MyWigetState extends State<MyWiget> {

  MyBloc bloc;


  @override

  void dispose() {

    bloc.bar.close();

    bloc.foo.close();

    super.dispose();

  }

  @override

  Widget build(BuildContext context) {

    // ...

  }

}
Dispose of the objects to prevent memory leaks
This means to close the object build for a specific class that is no longer in use. This is done because the same object would run in the background and slow the app speed as well as lead to memory leaks.
7. Well-defined architecture
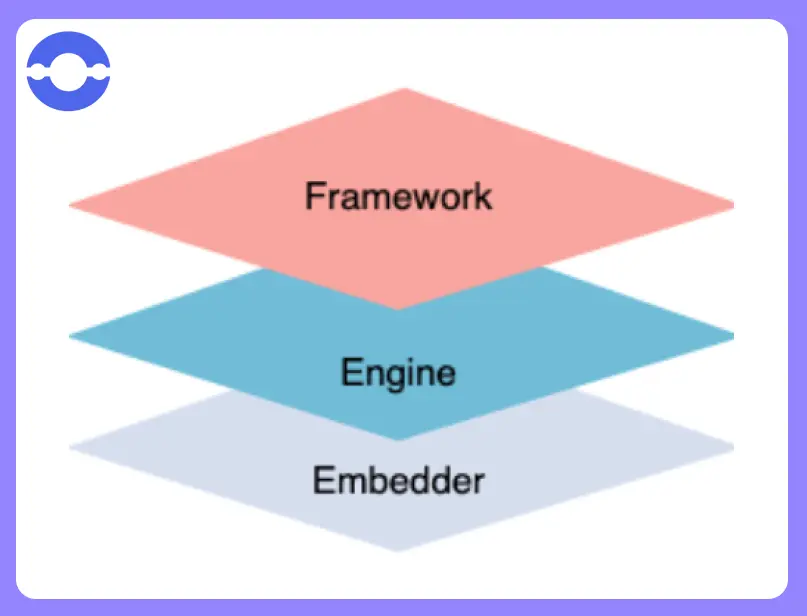
The next and perhaps one of the most important Flutter best practices is to give the Flutter app a well-defined architecture. Let’s first understand some of the basics of Flutter architecture.
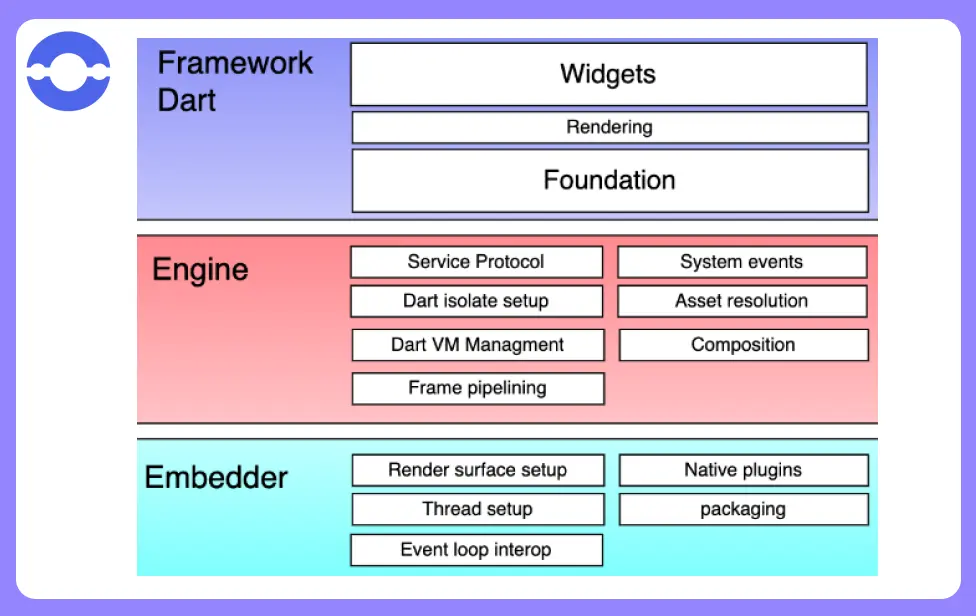
The Flutter architecture consists of 3 development layers namely Embedder (the lowest one), Flutter Engine (in the middle), and Flutter framework (the topmost layer).

The Embedder layer creates an entry point and coordinates with the operating system to facilitate services such as rendering surfacing, message event loop management, inputs, as well as accessibility.
The Engine layer is written in C++ and handles input, output, and rasterizing composited scenes since Flutter is a UI toolkit. Skia library is leveraged for rendering graphics. Additionally, this layer also manages service and network protocols, such as network input and output, file management, and the core API of Flutter.
The top-most layer i.e., the Flutter framework includes the material parts, widgets, or the Cupertino. It becomes the foundation element of app development. This layer offers the Flutter framework parts and the toolkit just renders the stuff easily. Flutter further makes it easy to leverage interesting, exciting, and engaging widgets, animations, gesture detectors, etc., required to elevate custom software development.
Further, each layer has additional components that interact and coordinate with each other to offer a seamless user experience.

To build a strong well-structured, and defined architecture, developers could make use of the Get_cli package, which has 95% popularity on pub. dev. This tool helps with the generation of complex project hierarchies, such as views, controllers, and pages.
Additionally, it offers a wide variety of other useful commands, such as commands for managing dependencies, running tests, and generating documentation. However, this tool could only be used with GetX.
Developers could also follow Model-View-Controller (MVC) or Model-View-ViewModel (MVVM), some of the most basic and oldest architectures for a project.
8. Choose third-party packages carefully
In Flutter, libraries are called packages. These packages are attractive choices for each functionality. They, in fact, supplement the core library functionality. Thus, the careful addition of these packages is an important Flutter best practice.
Flutter explains a Dart package as a directory containing a pubspec.yaml file. It further adds that a package can contain dependencies (listed in the pubspec.yaml), Dart libraries, apps, resources, tests, images, fonts, as well as examples.
The UI toolkit supports the usage of shared packages contributed by other Flutter and Dart developers as this practice facilitates the quick development of a Flutter app, without the need to build everything from scratch.
However, choose and use third-party packages carefully.
There are multiple factors such as the update cycle and frequency of a package, its popularity, open issues in the package code repository, etc., that need to be checked before choosing and integrating a third-party package.
For example, if the support of a package that has been integrated within the app some time or years back gets removed from the Flutter ecosystem, the app performance could be hampered, and, in many cases, the app crashes.
The pub. dev site gives a list of multiple packages that are developed by Google engineers as well as other members of the Flutter and Dart community, that could be used in Flutter app development. The site gives the last updated package date, the publisher, likes, and pub points it gained from the Flutter community as well as the popularity percentage of that particular package.
Packages that are integrated should be thoroughly checked for their updates, popularity, and longevity. Only the packages that are well-updated, monitored, and managed should be chosen.
9. Use commas to intend your code
Using commas simply enhances the readability of your code and thus, is one of the most important Flutter best practices. It conveys the intent of the code and makes the development process unambiguous. Multiple teams are able to coordinate better and build the most relevant product with a clean code.
10. Linting rules
Linting is a process that is used for checking code for any potential errors or formatting issues. Linting rules are thus a set of guidelines that can be used to automatically check code for any potential issues or bottlenecks.
When the team working on a project is large, Linting rules especially are recommended to boost coordination and uniformity in the project. In case not everyone has the knowledge of the style guide or needs reminders on some rules, these rules come in handy.
Linter/Lint could be used for linting in Flutter app development. It is a tool that analyzes source code to flag programming errors, bugs, stylistic errors, as well as suspicious constructs. It supports verifying code quality. Linter such as flutter_lints, very_good_analysis, lints, riverpod_lint, custom_lint, etc., are some of the popular packages for Flutter.
But how to enable lint rules in Dart?
Enabling individual rules
On subsequent lines, a developer is required to specify the rules that needs to be applied, prefixed with dashes (the syntax for a YAML list). For example:
linter:
  rules:
    - always_declare_return_types
    - cancel_subscriptions
    - close_sinks
    - collection_methods_unrelated_type
    - combinators_ordering
    - comment_references
    - dangling_library_doc_comments
    - implicit_call_tearoffs
    - invalid_case_patterns
With Linter rules, the team follows a consistent style, which enhances coordination and allows the team to add new developers without the fear of style inconsistencies and thus, it is one of the best practices in Flutter.
Linting is especially helpful for long-term projects and Linting rules can be customized to meet the project or team requirements.
11. Use the latest version of Dart and Flutter
Using the latest versions of Dart and Flutter is considered a best practice in Flutter app development for several important reasons such as:
- New versions are released to address established issues, bugs, and performance bottlenecks.
- Fresh versions also come with security updates to overcome vulnerabilities and keep tools and libraries updated for any security-related issues.
- As Flutter and Dart evolve, older code may become deprecated or incompatible with the latest versions. To avoid issues arising from this incompatibility such as deprecated features or breaking changes, you should always use the latest versions.
- With each new version, fresh and advanced features, widgets, and APIs are introduced for enhancement of the app’s functionality and user experience.
- Libraries and packages that are developed by the Flutter community are generally maintained in sync with the latest Flutter and Dart versions. Using outdated tools may result in ecosystem compatibility issues.
- As time progresses, it may become increasingly challenging to update an app that’s based on older technology. Leveraging the latest versions facilitates easy app maintenance and extends your app, ensuring its long-term viability.
Since staying current with the latest version is crucial for the app’s working and long-term maintenance, some practices need to be implemented while upgrading. These practices include:
- Thorough app testing for proper functioning before deploying an update to production.
- Careful review of the release notes for both Dart and Flutter. This will help you to understand any breaking changes, new features, or recommended migration steps.
- Create backups or snapshots of your codebase before upgrading to have the option to revert to a previous version if issues arise during the update process.
- Lastly, update your project’s dependencies, including third-party packages, to versions that are compatible with the latest Dart and Flutter versions, at the time of upgrading.
Conclusion
Following these Flutter best practices could help businesses and custom software development teams to build high-performing and quality apps whilst having a smoother and more efficient development process.
Dedicated development teams just need to continuously learn, stay updated, and grow with the Flutter ecosystem to build efficient and practice Flutter apps in this highly competitive cross-platform, and iOS and Android app development ecosystem.
Happy Flutter coding!


