Apple is a name that has changed the way we humans interact with devices. Apple devices are not merely devices, they are a status symbol in the society. They are indulgences. In fact, Apple users depend on their iOS app to be in control of their lives and their everyday hustles.
Due to this reason, businesses are increasingly investing in iOS app development. However, to build the product right and for maximum results, a business should be aware of the basics of the Apple App Store and an iOS app publishing process.
This blog thus aims to simplify the understanding of the App Store for its readers and answer the ‘how’ of the iOS app publishing process.
What’s the App Store?
The App Store is a digital distribution platform where users can buy and download digital software and applications for all Apple devices Apple launched the App Store in 2008, a day before the launch of iPhone 3. Additionally, they originally limited the first app store to just iOS.It later expanded to offer apps for Macs with the App Store macOS in early 2011.
The iCloud, a cloud storage and cloud computing service from Apple, stores the apps purchased or downloaded from the Apple App Store. This storage facilitates easy access from any signed-in device.
Let’s now look at the process of publishing apps on one of the biggest app platforms worldwide.
The Process to Publish an App on the App Store
There are some prerequisites to publishing an app on the App Store. These prerequisites include:
Steps to Add a New App
An app record must be created in the App Store Connect account before uploading a build of your app on that platform.
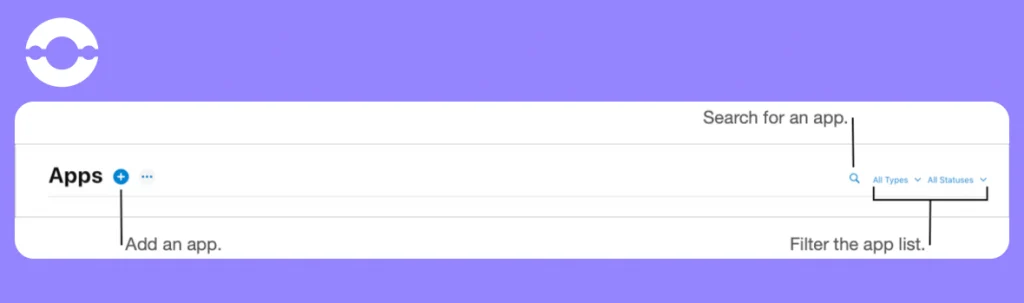
1. Go to My Apps and click the add button (+) on the top left.
Note: You would see a blank My Apps page until a first app recorded is created.
2. You would next see a pop-up menu. Select New App.
3. In the New App dialog, choose one or more platform. Then, enter the app information.
4. Under User Access option, choose Limited Access or Full Access, as per business’s needs.
5. In case of Limited Access, select all the users you would like to have access to this app.
6. Lastly, click on Create. Ensure to look for messages that provide details about missing information.
After the creation of an App Store Connect record for an app, the app appears in My Apps.
The app status reads ‘Prepare for Submission’. You can choose the app on this page to view and edit app information.
Optional Setting of the Developer’s Name on the App Store
You would see your developer’s name appearing under the app’s name on the product page on the App Store. The App Store uses the legal name by default. The App Store uses the legal name by default.
If a business has enrolled in the Apple Developer Program as an organization, it may put a different developer name. You can only do this if you have a registered trade name, DBA, or fictitious business name.
For example, if the business goes by the legal name “Software Company LLC”, the trade name thereby can simply be “Software Company”. You can set this on the App Store.
However, in case you’re enrolled as an individual, then the above-mentioned option isn’t available to you. This means that the developer’s name is the same as your legal name.
Why is it important to add the developer’s name correctly? This is because it can only be set once; when adding an app to the respective account the very first time. You cannot edit or update it in the future.
Steps to Add the Name:
1. Go to ‘My Apps’, click on the add button (+).
Note: You would see a blank My Apps page until a first app recorded is created.
2. A pop-up window would appear. Add the developer’s name into the ‘Company Name field’.
3. After filling the other required details, click on ‘Create’.
After your app has been approved by Apple, the entered name would be displayed under the app name on App Store product page.
After you add an app to your account, you can view and edit the app information and platform version information in the ‘My Apps’ section of the App Store.
One needs to add some information prior to uploading a build or submiting the app for review. Further, while some properties can be edited anytime, others can only be touched when the app status is shown as ‘editable’.
Additionally, the App Store information can be localised as well.
- Go to the ‘My Apps’ section and click on the app you want to view. A page opens with the App Store tab selected.
- As the next step, choose the app version under the platform, that requires editing. This can be selected from the sidebar.
- Go to the App information under General in the sidebar and update the information that is shared across platforms. (To learn more about a property, either click on the question mark next to the field or just go to App information.)
- Lastly, click on ‘Save’.
Platforms could be added to an app to enable a universal purchase.
For example, macOS and tvOS version of the app could be added to an existing iOS app. This would facilitate the distribution the iOS, macOS, and tvOS apps together.
The macOS app and tvOS app makes use of the same Apple ID (an app identifier), SKU, as well as bundle ID as the iOS app, and is as good as creating a new version.
- In ‘My Apps’ section, select your app. The page that opens has the App Store tab selected.
- In the sidebar, click on either ‘Add iOS App’, ‘Add tvOS App’, or ‘Add macOS App’ for the platform that is required.
After following these steps, you would see a version for the platform selected in the sidebar. It would have a version number 1.0.
This version number could also be changes by going to the ‘Version section’ under General App information.
3. Review and add metadata about the new platform version selected.
Once a platform is added, metadata from the existing platform version gets transferred to the new platform version. Additionally, the promotional text, description, and screenshots, stay put.
Steps to Upload Builds
Uploading The App Binary Files With Xcode:-
1. Start With Creating an Archive of Your App
In order to utilize any of the distribution methods, an archive of the app must be created first.
What’s an archive? It is a build of the app, that includes debugging information, which is stored in a bundle by Xcode.
After you open the main window of your Xcode project, choose a target and build-only or real device from the Scheme toolbar menu. With the target as a simulator, archive cannot be created.
Thus, select Product > Archive to build the target. Then, create the archive you want to appear in the Archives organizer.
Note: Select device Any iOS Device(arm64)
Once an archive has been created, you can access the Archives organizer directly by choosing Window > Organizer.
For confirmation of your app being ready to submit to TestFlight or the App Store without submission, select your archive and then click on ‘Validate App’. Xcode will perform a limited, automated initial validation of the app and also offer feedback.
2. Select a distribution method and options
The archive can be exported or uploaded to the App store Connect.
Export the application to distribute it outside of the App Store and upload it in case you want to distribute it through TestFlight or the App Store.
In the Archives organizer, first select the archive, and then click Distribute App. In the next sheet, choose a distribution method based on the app’s platform.
Steps involved in the distribution of the app:
Step 1 – In order to distribute the app to a limited number of users on registered devices only—for example, distribute within your company or organization—select ‘Ad Hoc’ or ‘Development’.
Step 2 – In case, you want to distribute using TestFlight or through the App Store, select ‘App Store Connect’.
Step 3 – If you are a member of the Apple Developer Enterprise Program and in case your app is ready for release to users in your organization, select ‘Enterprise’.
In the sheets that would appear after distribution method has been chosen, select the distribution options. The latter should be chosen based up on the former.
For example, if the app export distribution method has been selected, then you need to choose app thinning and on-demand resources options. This is because, you would be required to distribute the app yourself.
On the other hand, if you have gone for the App Store Connect or Developer ID as your distribution method, then you need to select a Destination option as well. You have the option of uploading your build to the App Store or Export your build locally to upload later.
Steps to Test a Beta Version
Begin by entering the test information
1. In ‘My Apps’, choose your app.
2. Then, click on the ‘TestFlight tab’.
3. In the sidebar, under General Information, click on ‘Test Information’.
4. Choose a language option and enter required test information, on the right side.
The information entered for the beta app could differ from the information that would be entered later when the app is submitted to the App Store.
- In the ‘Beta App Description’ text field, add a description of the beta version of your app.
- Then, in the ‘Feedback Email’ field, add the email address that testers can use to reach out to you through the TestFlight app. This is also the reply-to address in email invitations to testers.
For descriptions of the TestFlight App review information properties, visit App Review information.
Steps to Add Internal Testers
Creation of a Group
- Go to ‘My Apps’, select your app
- Click on the TestFlight tab
- In the sidebar, click the add button (+) placed next to Internal Testing
- In the dialog that appears, add the name for a new internal group, then click on ‘Create’. The name could be changed later, if required.
Addition of Internal Testers to a Group
- In ‘My Apps’, choose your app
- Click on the ‘TestFlight’ tab
- In the sidebar next to Internal Testing, click on the add button (+)
- Then, next to Testers, click on the add button (+)
- Select the checkbox next to each user you want to invite, then click on ‘Add’
Addition of Builds to a Group
- Go to ‘My Apps’, select your app
- Click on the ‘TestFlight’ tab.
- In the sidebar, select the group you want to add a build to.
- On the right, click on the add button (+) next to Builds.
- Select the build you want to add to the group, then click on ‘Next’.
- Enter the ‘What to Test’ information and optionally add localized versions of test information in the fields under each language-specific section.
- Lastly, click on ‘Add’.
Adding Testers to Builds
- In ‘My Apps’, choose your app.
- Click on the ‘TestFlight’ tab.
- In the sidebar, under Builds, click on the platform.
- On the right, select a build by clicking on the app icon or build string for the build from either the Versions or Build Groups tab.
- Next to Groups, click on the add button (+).
- Choose the group you want to add to the build to, then click on ‘Add’.
Note: Original product page is confidential and hence the screenshots of the same could not be attached.
After completion of testing, one now needs to upload or submit the build for AppStore.
Choose a Build to Submit
Prior to submission of the app for App Review, one must choose the build (from all the builds that were uploaded for a version) that needs to be submitted.
Only one build could be associated with an App Store version. However, the build could be changed frequently, as required, until submission has been made of the version to App Review.
Adding a Build to a Version
1. In ‘My Apps’, select your app. A page opens with the App Store tab selected.
2. In the sidebar, click on the app version under the platform you want to choose.
3. Then, scroll down to the Build section on the right, and then click on the add button (+) next to Build
The add button (+) appears if you’ve uploaded builds and still haven’t selected a build. If a different build gets selected instead of the one you would like to submit for review, remove the build.
4. In the Add Build dialog, choose the build you want to submit
If an earlier version of your app has the ‘Ready for Sale’ status, then the list only includes builds that have been uploaded by you since that version was released on the App Store.
Learn how to view available builds.
5. Click on ‘Done’
In the Build section, you would see the app icon, build string, and upload date and time
6. On the top right, click on ‘Save’ and ‘Add for Review’. And with this, your app submission is successfuly the App Store.
This was the detailed process of publishing an app on the Apple App Store. Once the app has been beta tested, the Apple team does the final review or the live testing. After the final review by Apple, a checkbox asks the business or individual if:
- You want to ‘Release Automatically’ after completion of the review by the Apple team or,
- You want to release manually after review; it will give you a button to publish the application in the app store manually by the developer
For making the app live manually, one must follow the Apple App Store guidelines (design, privacy, and community guidelines). Once Apple finds that all these guidelines are adhered to, then only it would give you to make the iPhone app live manually.
Review Process
In older days, it used to take 3-4 days for an iOS app review. However, with advancements in processes and techniques, it just requires you to correct information about the application for testing every feature, and voilà! It is faster than ever.
However, not a lot of apps make it to the App Store in the first attempt. In fact, it was reported that the App Review team rejected over 34,500 apps in 2021 for having hidden or undocumented features. Moreover, more than 157,000 apps were rejected for being spam, copycats, or misleading to users.
So, the process to publish an iOS app may be long due to the strict review methods and policies; however, it is secure and rewarding. Furthermore, the App Review team provides a developer with clear feedback about why their app wasn’t able to make the cut. Developers might feel frustrated and disheartened in the short term, but they become more skilled at mobile app creation eventually.
So, if your iOS lands on the App Store, congratulations! You did a great job. The joy of getting the app published on the App Store is immense due to the rigorous nature of the process.
However, a business must be aware and updated about the holiday season to avoid any unforeseen delays in the publishing process. For example, during Christmas, the Apple office remains closed for around 7-8 days. It’s the holiday season for them.
Although, the Apple team informs a potential user that any review process would not be carried out during the holiday or said period. But still, a business would be left hanging if it wants to publish an iOS app during that period due to any reason. To avoid such sticky situations, businesses should plan the iPhone apps better, keeping the Apple company leave calendar in mind.
How Much Does it Cost to Publish Any App on the App Store?
To publish an app on the App Store, one must join the Apple Developer Program. Membership comes at $99 per membership year for the basic version and $299 for Enterprise Program. Non-profit, educational institutions, or government entities may be eligible for a fee waiver.
If the app must go under the name of an organization, companies, and educational institutions must provide a D-U-N-S Number (Data Universal Numbering System) which is available for free, registered to their legal entity during the enrolment process.
Note: Apple explains the D-U-N-S Number as a unique nine-digit number that offers business entities identifies business entities on a location-specific basis. Assigned and maintained by Dun & Bradstreet (D&B), the D-U-N-S Number is widely used as a standard business identifier.
Once a business follows every guideline and publishes its app on the App Store, it should optimize the app for maximum results as the next step.
So now let’s look at why a business needs to optimize an iOS app once it gets live on the Apple App Store.
App Store Optimization
In 2022, the Apple App Store had around 1.6 million available apps for iOS. So, if we look at it the App Store is a highly competitive platform. A business that wants to be visible on this platform must employ every method, and every technique to be a top-ranking iOS app on the App Store search.
App Store Optimization or ASO helps the business to achieve exactly the same. It works in a similar way to SEO. The only difference is that SEO optimizes the app for search engines, while ASO does it for the App Store/ Google Play Store. ASO works to better your app visibility and engagement on the App Store.
It is a process of enhancing your app’s rank and discoverability in an app store. The higher your app ranks in an app store’s search results, the more visible it is to potential users, and hence, the more engagement.
The benefits of ASO are as follows:
- Organic installs and engagement lead to lower acquisition costs
- App reaches the relevant audience
- Keeps the app up-to-date and relevant with the changing times
- Facilitates more revenue and future app stability
Therefore, the concept might look insignificant, but the fruits it bears are too many. Thus, businesses should take it seriously.
And if you are not sure about how to implement it, you have landed on the right page. Big Oh Tech can help you!
How BigOhTech Can Help
We are adept at web and iOS mobile app development, publishing process and launch. We are aware and well-versed with the Apple guidelines, rules and regulations.
BigOh has extensive experience in publishing iOS apps with multiple features while adhering to the Apple design guidelines and privacy policies. We have uploaded applications written in native Swift and cross platform SDKs like Flutter, and we have been successful in keeping them up and running till date.
BigOh also implement the latest ASO and SEO techniques that make your app shine on an app store and get you maximum engagement.
We keep ourselves abreast of the latest and modern marketing strategies and our experts then assist the clients to leverage app store and social media platforms to reach and engage with a wider audience.
So, contact us today and skip long queues on the Apple App Store for visibility!
Get clear visibility on the App Store with us!
FAQs
Q1. What are the requirements to publish an app on the app store?
There are some prerequisites to publishing an app on the App Store:
a. Required role: Account Holder, App Manager, or Admin. View role permissions.
b. Visit AppStore Connect Homepage
Q2. How many apps can I publish on the app store?
A business can publish as many applications as it can get Apple’s approval. However, submitting too many similar apps may become grounds for rejection or even removal from the Developer program (Refer to app store guidelines Section 2.20).
Q3. How do I distribute an iOS app internally?
The process to distribute an iOS app internally is:
a. For Internal testing of an iOS application, we use .ipa files.
b. Before building iPA we add the user/tester/dev’s UUID to Apple Developer Account.
c. As the next step after archiving, we select ‘Development’ in Xocde as the distribution setting. As an output, it provides a .ipa file, which can be installed in the registered UUID devices.
d. For installing iPA in iPhone there are multiple tools available. As a leading iOS app development company, BigOh uses Diwai to generate installable links, for best results.
Q4. How long does it take to publish an iOS app?
The submission of an iOS app for publishing on the App Store can take at most 2 days and longer, depending on your app.
The app reviewers review an average of 50% of apps within 24 hours and review more than 90% of apps within 48 hours. After submitting an app, businesses can check its status in the My App section of iTunes. If you are short of time, then you can request an expedited review too.