You've developed a mobile app and now you want to publish it on Google play store. But play store submission isn't a difficult job as it seems. It's all about paying a one-time registration fee and complying with the Google requirements and developer program's policy.
Every day, 1,205 apps are added to the Play Store while this number continues to rise but Google keeps on monitoring app submissions and blocks the app if it violates its policies. That's why in 2023; 2.28 million apps were discarded from being published on the Play Store.
And if you want to publish your app successfully to Play Store, then read this guide to learn the 7 simple steps that you can do now to bring your app in the eyes of millions of users.
60 Second Summary
Publishing an app on the Play Store in 2025 is easier than it seems.
Pay a one-time $25 fee, create a Play Console account, and follow 7 simple steps.
Add app details, set privacy, content rating, and audience.
Provide demo access, disclose data use, and complete store listing.
Test your app internally, promote to production, and select target countries
Google reviews your app in 2–7 days.
Post-launch: fix bugs, respond to reviews, and optimize your listing.
Need help? BigOhTech handles everything from development to successful launch.
What Is Google Play Store?
Play store is an online platform developed by Google that allows consumers to access various types of digital content. It’s not only a hub of apps as users can find various collections on it such as movies, books, music, and games. Users can access the pay store through the home screen of Android devices.
Google play store was initially known as the Android market, and it was launched in 2008. Over the past few years, it went through major updates, and there has been significant improvement in UI and functionalities.
Moreover, the play store is one of the essential elements for promoting your App.
But, in 2012, its name was changed to play store. Currently, the google play store hosts 3.95 million apps and games. Users can download the play store on Android phones and tablets for downloading apps and accessing digital content.
Process To Publish App On Google Play Store
To publish an app on Google Play Store, follow these steps:
For uploading apps to the play store, the developer needs to have a developer license for the app store and play store. The play store license costs around $25, that’s the cost to publish an app on play store. The developer must pay a one-time registration fee, which lasts forever.
1. Google Play Console
Once your App is ready to be published on the play store, you must create a Google Play console developer account. To create a google play console developer account, click on ” go to play console” and sign in with your Google account.
After that, you must complete the form and enter the developer’s name. It’s optional to fill in your legal name there. You need to pay a one-time registration fee ($25) for this, and you are good to go with this.
2. Create An App
After creating an account, you will head over to the play console dashboard. For this, you need to create an app. Here, you will click on Create an App and enter the app details such as name, language, and type. Remember! You won’t be able to change the app name after publishing it if it is a free app.
After entering app details, you need to give a declaration that states you're complying with developer program policies and US export laws.
These policies become a guiding point for them to ensure whether your app is safe for people or not.
For instance - if your app contains content that promotes hate among people, or you want to create a dating app, but it doesn't comply with child safety standards policy, then the app would be discarded.
If you want to know more about Google’s developer policies, then you can read it here.
3. App Setup
When you launch the App, you’ll be directed to its dashboard. To configure your App, follow these simple steps:
a. Firstly, Provide information to Google about your app content
b. Set up a privacy policy by adding a privacy policy URL if your target audience consists of children under 13
c. App Access
Here, the developer needs to provide demo credentials so that Google must be able to access all parts of your App. In addition, You must add a username and password in the app access section. Otherwise, you need to select an option – App without restrictions.
d. Ads
Here, the developer needs to choose whether your App contains any ads. However, If you intend to choose the option – my ad contains ads, it will show ads on the play store.
e. Content Rating
The developer is given a questionnaire to obtain official content ratings for their App. The answers provided by the developer will help the play store understand the App’s content.
So, To begin, click on the “Start Questionnaire” button and select the appropriate app category.
The questionnaire will then ask a series of questions, including whether the App enables content exchange. Once you answer all questions, click on the “save button” to proceed ahead.
f. Target Audience
Here, you need to specify which age group of your client persona your App is targeting. For example – If your App is developed for children, you must take additional steps and upload an additional privacy policy.
g. News App
If it’s a news app, the developer must comply with google play news policy.
h. Data Safety
You are required to provide user data collected by your App. The information provided by the developer will appear on the app store listing, helping users understand privacy policies and data handling practices before they download it.
Here, you need to disclose various points; otherwise, your App will be rejected –
Any user data that is collected and shared
Any user data that is being transferred from the server to a third party
Any user data that is collected or transferred through web view
4. Store Presence
Now comes the store listing section, where you can create information displayed on the app page in the google play store. It includes various things such as selecting an app category, writing an app description, and uploading App images.
Additionally, If your app listing section is informative and engaging, more users will download the App.
a. Store Settings
Select an app’s category and enter the store listing contact details and email address.
b. Main Store Listing
In this, you need to provide an app name, briefly describe your App, and upload an app icon, images, and videos for your App. Google will show these details on the main page of the app listing on the play store.
Additionally, you can modify an app’s description and additional creatives later on.
5. Release Your App
Once you have followed the previous steps, you can go back to the app dashboard to follow a few steps to release the App. Firstly, you must get your App tested on a small set of users, and after testing is conducted, you can publish your App.
If you want your App to be available for internal testing, upload the App to internal testing, add the tester, and finally upload the App to production.
In the internal testing section, you must add a tester email, which makes it possible for testers to download the beta app from the play store.
Once you have added testers, share the testing invite link with testers so that they can accept the invitation and continue downloading the beta version of the App from the play store.
b. Create The Release For Internal Testing
Now, click on the Create Release button on the top left corner. Upload the application file (.apk) or (.aab), review the release name, which will be an application version, and provide release notes.
The team at the Play Store will assess your app and provide feedback within a few days after your initial upload. So, After receiving the reviews on the first App, your next release will be immediately available for internal testing.
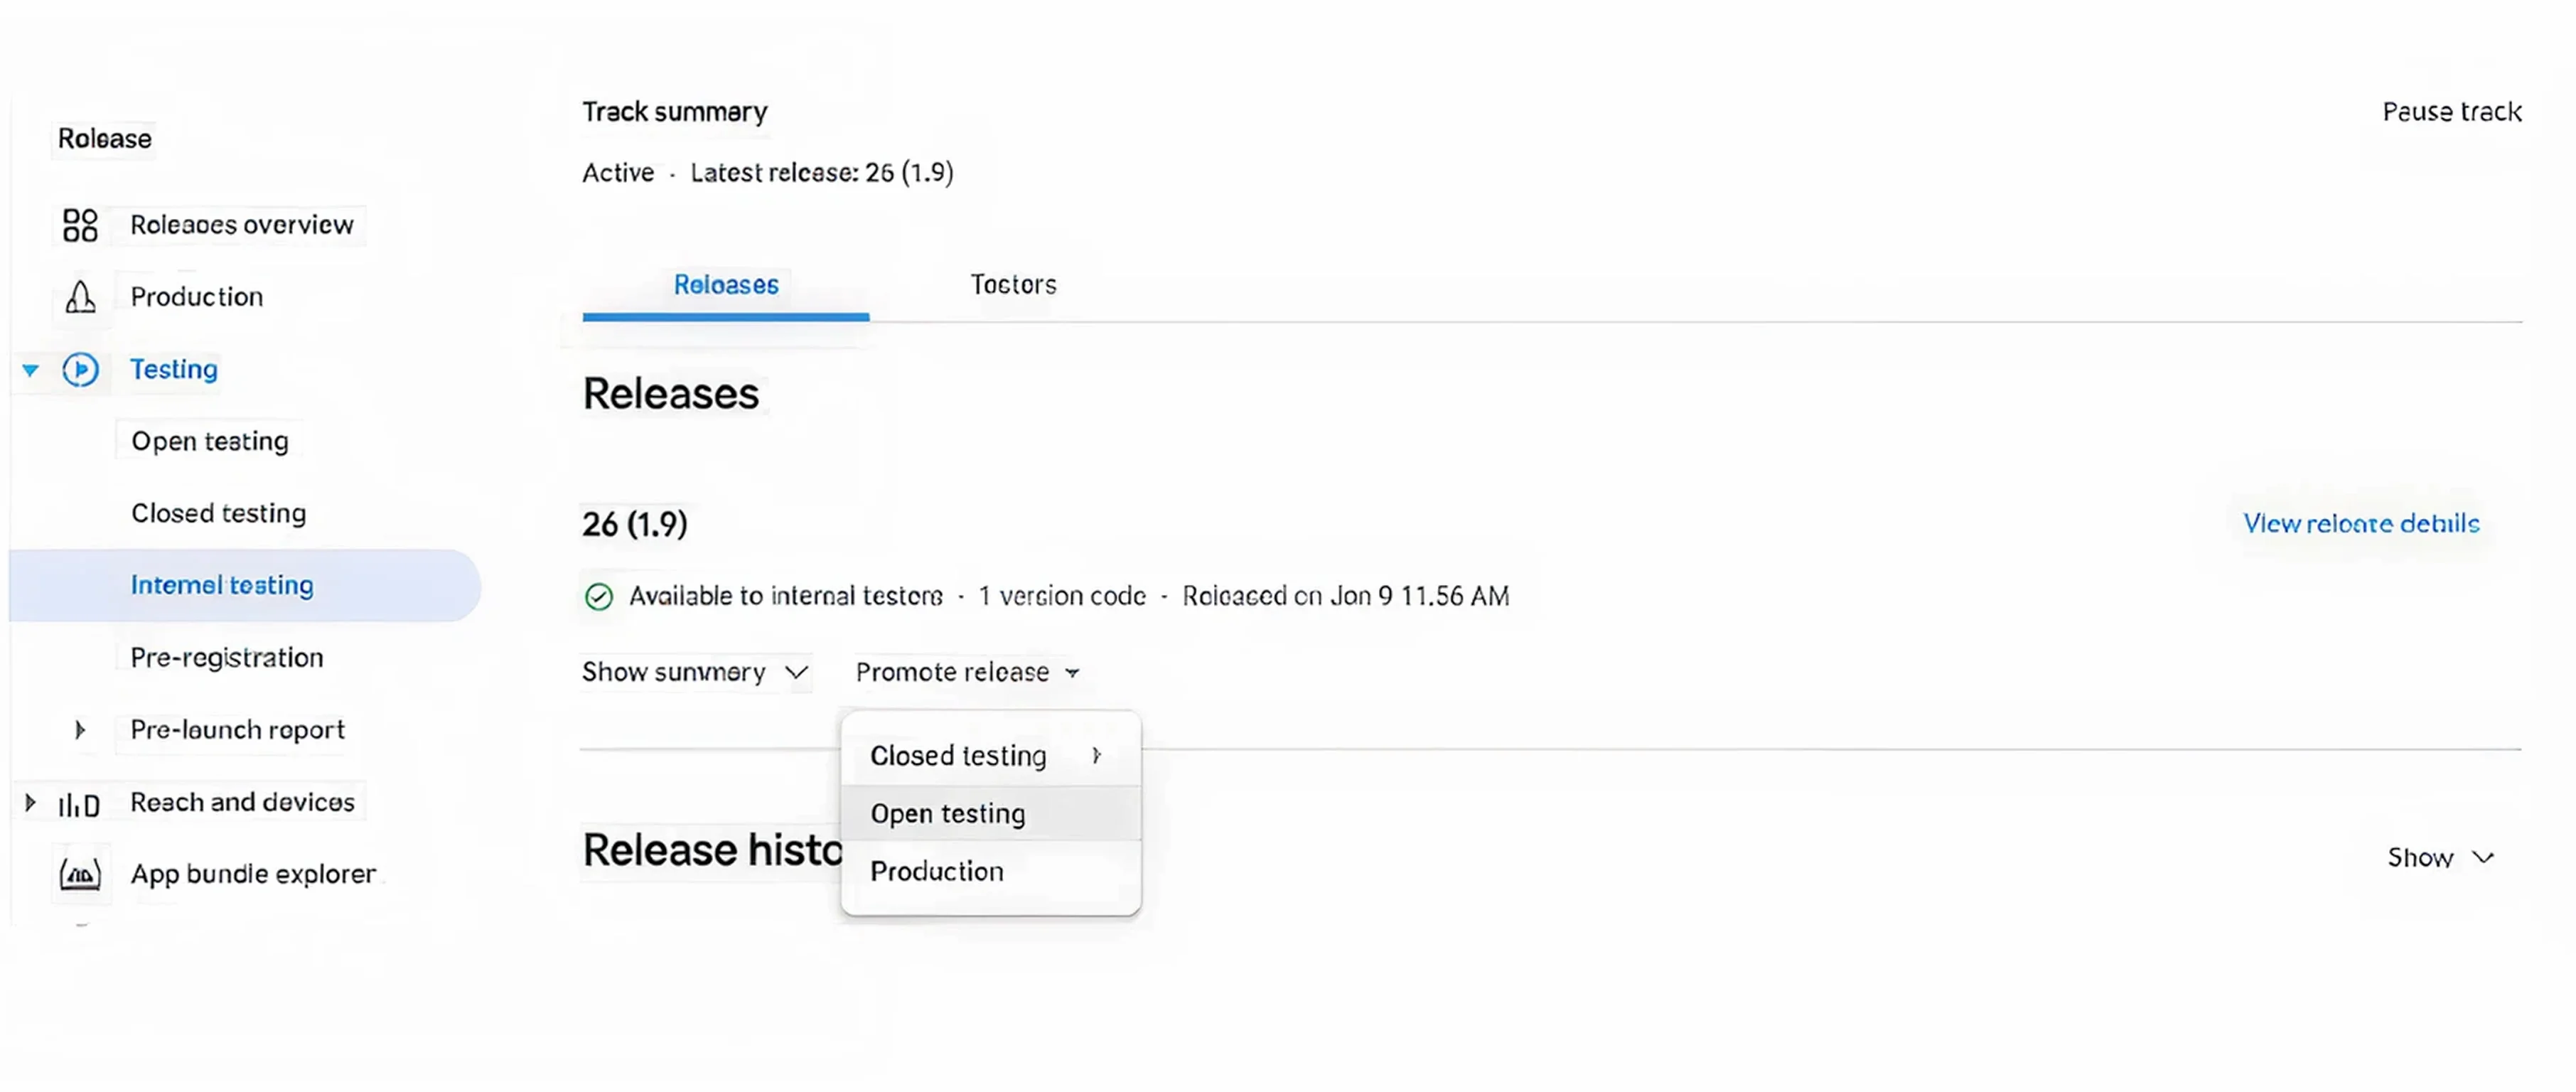
c. Directly Move The App From Internal Testing To Production
Once you find that your App is working perfectly, it’s time to move internal testing built to production without creating a new release for production. In the internal testing section, click on promote release dropdown, and select production.
7. Production
a. Select Countries and Regions
Decide which countries your App will be available. If the App’s functionality is not limited to a specific country, no additional charges are incurred for selecting all countries.
You need to ensure all these things before releasing your App because some countries restrict the app availability.
b. Create a New Production Release
You need to follow some steps to create a new production release – Head over to the production section and click on Create production release by clicking the Create new release button.
So, you need to hit the upload button to upload the APK file and enter the details – release name and version name.
When the App is in final release mode, the play store raises alerts and warnings found in your application file (.apk or .aab)
c. Already Submitted For Review
Your App is ready to roll out once you click the start roll out to production button. If your managed publishing is off, your App will be live immediately. Managed publishing allows the developers to control the App after publishing.
d. Handling Rejection
If the play store feels that there are no issues in your App, it will publish the App right after review. But, if the play store finds some issues in your App, then they will reject the App and share the reasons for rejecting the App.
One of the causes for app rejection is that developers do not comply with google play store policies. So, Read the email carefully to fix the issues reported by them.
BONUS- What to do after publishing your app on Play Store?
Let's give you a quick walkthrough of how you can promote your app on Play Store-
You want more app downloads. The best place to get users is promoting your app on social media channels. You need to think strategically which channels will bring more users – LinkedIn, Instagram or Pinterest.
Look upon the bugs or challenges faced by users. Add new features, fix the issues and update your app whenever required.
Pay attention to play store reviews. An app with negative reviews and lower ratings isn't going to appear in app store search results. Got negative reviews? Reply to those negative feedback and solve their concerns.
Talk to the existing customers who used your app and see what all improvements or fixes they need. Retaining customers on app is easier than acquiring new ones.
Optimizing your mobile app is important for better visibility in Play Store and that's done through app store optimization (ASO). App store optimization focuses on optimizing mobile app listing pages such as app name, description, reviews and ratings etc.
How Can BigOhTech Help?
We hope this guide is enough for you to get through the publishing process easily. Though publishing an app on Play Store comes with a certain fee, that's 25 USD and it's a one-time registration fee for creating a Play Console account.
But that’s a mandatory step for creating a developer account and once payment is done, you can publish multiple apps as well.
But developing an app is never treated as a ONE AND DONE process. You need to think of marketing strategies to promote your app so that it reaches millions of users.
We have 15+ years of experience in Android app development, and we are there with you from the ideation stage to the stage where applications go live. One of the clients we served is HCL Music, a live music streaming platform for Indian music lovers.
The company was facing one problem – there was no auto recommendation engine due to which users didn't get music recommendations based on their interests and genre.
Result – Such personalized recommendations increased user app engagement.
PS - Looking to develop and publish an app on the play store?
Wrapping Up
So, you get valuable insights on publishing app on google play store. We hope this guide is enough for you to get through the publishing process easily.
But don’t think your job is over once an app is published.
You must create effective marketing strategies to promote your App in the future, make yourself stand out from competitors, and get your App featured on the google play store.
FAQs
Q1.How long does it take to publish an Android app?
Your application will go live after Google reviews it, and it does comply with google play store policies. Generally, Google can review the App within 2-7 days. Once the App is reviewed, it is ready to go live on the play store.
Q2.What are the tips for featuring your Android app on the google play store?
Here are the best practices to feature your App on the google play store –
1. You need to analyze other apps related to your niche or industry. List 3-5 apps and download them on your phone. Compare those apps based on various characteristics such as design and interface, set of functions, ease of convenience, etc.
2. Your apps should not contain bugs or lag; otherwise, google will not consider it. Google never wants to promote such apps that disappoint users. If your App’s performance is 100%, then Google can consider your App to feature it on the play store.
3. Finally, The interface of an app should comply with Google requirements. Google pays attention to the nitty-gritty details of an app – colors, big font, space between elements. The interface of an app looks attractive on all gadgets.
Q3.How should I prepare my App for the google play store?
Here are a few steps to publish App on google play store –
1. Firstly, Create a developer account by going to the google play console.
2. Secondly, Create an app by hovering over the play console dashboard.
3. Thirdly, Set up the App by following a few steps, such as providing information to Google about app safety, app access, content ratings, target audience, etc.
4. Fourthly, Go to the store listing section, where developers will provide information about the app category, write an app description, and upload images.
5. Release your App
6. Finally, Conduct internal testing
7. Move your App from internal testing to the production stage.
Q4.How can I benefit from publishing a free app on the play store?
Developers can first launch the App in free mode. Users prefer downloading the apps for free. In addition, A free app can get maximum users and increase app downloads. Later, developers can monetize the App through in-app purchases, sell physical products through the App, charging subscription fees for upgradation to a premium model.